🔗Ankifying a math course
How to quickly make a lot of Anki flashcards out of a large mathy course.Published on 2022-02-09
Last updated on 2022-08-25: Added good practices for using LaTeX note importer plugin.
Studying for any math course typically requires a large amount of memorization. This can range from blatantly drilling definitions and theorems into our brains to more subtly learning strategies we can apply to solve small subproblems. Flashcards are mainly associated with the former, though I'm of the opinion they can excellently assist with the latter as well. I was convinced to try them out by Michael Nielsen's writeup on using spaced repetition with flashcards to internalize difficult mathematics. For a deeper dive into effectiveness of spaced repetition as a study technique, check out Gwern Branwen's review of the topic.
The spaced repetition software I know and love is Anki. It's free and open source, and has a bunch of other nice features like LaTeX support or mobile-desktop sync.
As of writing, I had used flashcards to extensively prepare for multiple large, proof-heavy courses. On one hand I think this strategy works quite well, and I received lots of positive feedback on the flashcard decks I released to other students. On the other hand, I'm still perfecting my workflow, so perhaps take my words with a pinch of salt.
In this article, I will describe methods which allow me to relatively painlessly create and maintain large decks of math heavy flashcards.
Note that Anki is not the similarly named AnkiApp, which appears to be a closed source copycat app. I would strongly discourage using AnkiApp. Notably, it seems that exporting decks from AnkiApp is a paid feature, alongside some other limitations. If you're on iOS for which the real Anki is a paid app, you can use AnkiWeb for free.
🔗LaTeX in Anki
Note: I used Anki version 2.1.49.
There are two ways to have LaTeX in Anki:
- MathJax which needs no setup, or
- full blown LaTeX which requires a compiler to be installed, but is more customizable.
If you just want to make a handful of cards, MathJax may be sufficient. For
creating a lot of them, I think the latter option is more practical. Firstly,
if you use the full blown LaTeX method, you can add custom commands or use
LaTeX packages by modifying the preamble in
Tools > Manage Note Types > [Select the note type you're using] > Options.
Secondly, with this method you can just write your flashcards in a .tex file
in your favourite editor and import them en masse using the LaTeX note
importer plugin for Anki by
Marcus
Zibrowius.
Lastly, but perhaps most importantly, writing them in a .tex file may allow
you to write the cards considerably faster.
🔗Writing lots of flashcards, fast
The key concern I hear people have regarding using flashcards to study for a math course is that they take a long time to make. The bottleneck here is that, by default, typing out LaTeX takes a long time. One simple way to speed up the process is to use MathPix, which allows you to turn screenshots of equations into LaTeX. To go beyond just copy-pasting course material, however, we need a bit more effort. Thankfully we can smartly customize our text editor to speed up the typing by a lot.
Gilles Castel wrote an outstanding guide on configuring shortcuts for the Vim editor that make it possible to type out math lecture notes in real time. Briefly, these shortcuts rely on UltiSnips which allows for smartly inserting snippets of code when you type specific keywords. My setup is practically the same as Gilles', so I feel it makes no sense for me to repeat what he wrote. The difference his config made to my LaTeX typing speed is like night and day, so I strongly recommend just following his instructions.
To get a little taste of how his snippets work, see the animation below from his guide. It illustrates how few keypresses you need to make a LaTeX environment.
beg creates \begin{} and \end{}, with the cursor inside the curly brackets. Then, pressing tab moves the cursor into the environment.
Once you have UltiSnips up and running, I recommend going beyond Gilles' snippets and writing your own whenever you find yourself repeating a command or some complex symbol many times.
It may take some practice, but I think it's totally feasible to write out flashcards only slightly slower than the usual time it takes to go through and comprehend the script or a lecture. The bottleneck becomes actually understanding the content, rather than messing with LaTeX. Also, thinking of good questions to put in flashcards is a nice way to study the material anyway, so the time doesn't go to waste.
🔗Importing flashcards from .tex files into Anki
The aforementioned LaTeX importer plugin by Marcus
Zibrowius
can let you smoothly load flashcards written in a .tex file into an Anki
deck. It takes care of surrounding the entries with [latex] and [/latex],
but also makes it easy to update cards and to label them with tags. The
deck-building tips I provide below are largely based on guidelines given by
Marcus,
combined with vim snippets.
🔗Preparation
First, install the plugin.
Then, create a .tex file, and add these lines to the preamble. They are there
to ensure that the file will compile, so you see what you're working on.
% environments and commands to make the Anki importer environments compile
%% a counter for the flashcards
\newcounter{flashcard}
\setcounter{flashcard}{0}
\newenvironment{note}{\subsection{}\paragraph{NOTE (\arabic{flashcard}):} \addtocounter{flashcard}{1}}{}
\newenvironment{field}{\paragraph{field:}}{}
\newcommand{\tags}{}
🔗Writing cards
The plugin, at its simplest, imports all note environments with field
environments nested inside as you can see in the
examples.
The most basic kind of card has two fields: a Front
and a Back. However, if we write cards this way, they may be difficult to
update later on, since Anki will not be able to automatically match which cards
were which when we reimport them with changes. A way to work around this issue
is to use the first field to store a unique ID for each card. This way, when we
fix typos and reimport the .tex file, we can overwrite cards that match on
the ID and thus update them.
To do this with vim snippets, put these lines on top of your snippets file
global !p
import uuid
endglobal
and add this snippet somewhere else in the file
snippet note "Anki note" b
\begin{note}
	\begin{field}
`!p if not snip.c: snip.rv = str(uuid.uuid4())`
	\end{field}
	\begin{field}
$1
	\end{field}
	\begin{field}
$2
	\end{field}
\end{note}
$0
endsnippet
When you go on a new line and type note<TAB>, you will make a note with a
random ID for the first field, and then two fields for a question and an
answer.
🔗Using tags
Flashcards can be labelled by tags which allow you to focus study sessions on
specific topics. The LaTeX importer plugin looks for \tags{ ... } directives,
and marks all notes that occur further in the file with the tags.
I mainly use this feature for labelling which lecture or chapter a given note came from.
🔗Actually doing the import
Importing is quite easy, assuming you installed the plugin. Ultimately all you
need to do to import the cards from a .tex file is to go to File > Import
and select it.
However, there are some more things you need to do if you want to have IDs as the first fields for easier updating as mentioned before. The Anki interface is a bit confusing at times, so in my view the easiest way to go about this is to import a deck which comes preconfigured. You will then be able to reuse the note type that it comes with. So, import this deck; you will be able to remove it later. It contains a note type called Krzysztof's Basic Importable Card, which has an extra first field for the ID.
Once you've written a few flashcards and have a file similar to this example file, you can import it by doing the following:
- Go to File > Import and select it.
- Click on Deck and select which deck you want to import them into, or make a new one.
- If your LaTeX code does not require any special packages or commands, click on Type, select Krzysztof's Basic Importable Card. This option will be available if you import the sample deck I prepared.
- If your LaTeX code does require special packages or commands, click on Type > Manage > Add > Clone: Krzysztof's Basic Importable Card and give your note type a name. I would typically keep one note type per course. Then, select your note type from the list, and click Options. Here, you can specify the preamble that Anki will use while compiling your flashcards.
- Now, your window should look like below. Click Import, and you're done.
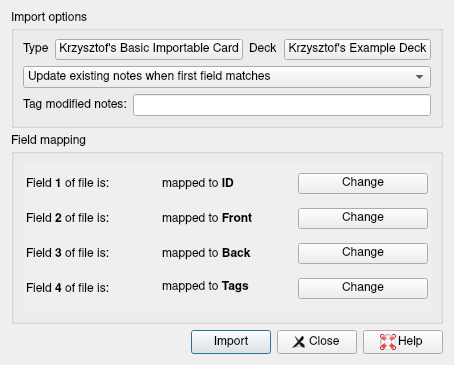
You won't need to do most of these steps every time. Usually, you just select the file and click Import.
🔗What to put into flashcards
Obviously the specifics of what to put into flashcards depends heavily on the course, but I think there are some general rules of thumb about what makes a flashcard good:
- The question needs to be a simple problem/pattern which may occur in the exam setting. This means you may need to make multiple flashcards for one mathematical object, to make sure you cover all the possible scenarios in which it may occur. For example, if you need to learn the statement of a theorem from its name, but also whether or not you can apply it in some example situation, you should probably make two separate flashcards. This is very important, because whether or not we can recall something appears to critically depend on the cue we receive (see introduction) (note: I'm not a neuroscientist beep boop). Brains are wonky, and they become even wonkier if you're stressed during an exam.
- The answers should ideally be as short as possible, so they're less bothersome to review in the long run. If you want to learn a proof, it's probably a good idea to split it into steps which are as simple as they can be.
🔗Dissection of a proof
I find it useful to split proofs into little, bite-sized chunks, similar to what Michael Nielsen suggests. This makes it possible to learn low level patterns that repeat between proofs.
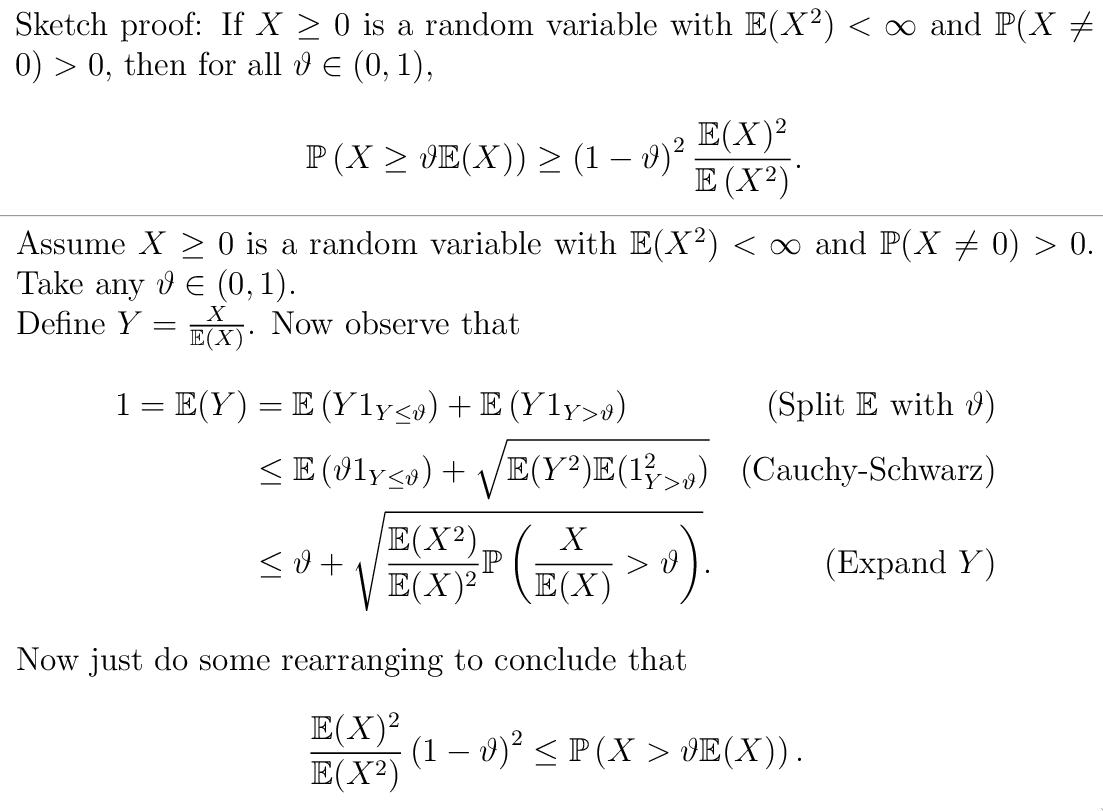
For an example, below are four flashcards I used to learn the Paley-Zygmund inequality and its proof. First, I just put in the statement.
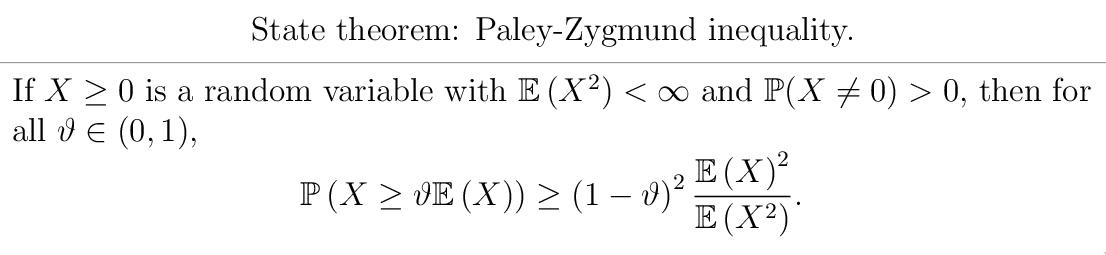
Then, I made two cards for proof steps that gave me an "aha!" moment.

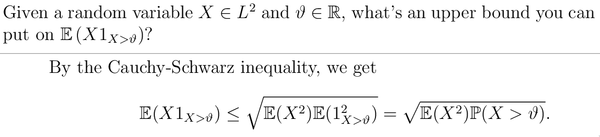
Finally, I created a card which connects the dots into one coherent proof. I think it's a good idea to put the theorem statement instead of theorem name in the card question, so that you can learn the mapping statement to prove -> proof rather than the longer theorem name -> statement to prove -> proof, since there already is a card for theorem name -> statement to prove.
🔗How to review cards
Ideally, to make use of the magic of spaced repetition, it's best to start early and review frequently. To not get overwhelmed by a large buildup of cards to review daily, it's a good idea to set the limit on new cards per day to something low. Michael Nielsen suggests 5, which to me seems like a fair number. Keep in mind that Anki schedules the cards you see in such a way that, if you find a card easy, it will pop up less and less often so take less and less of your time.
Of course, reality is typically far from ideal. In practice, I find myself typically just having intense Anki study sessions a few times per week, when I go through as many cards as I have the energy for.
🔗Advanced stuff
Here are the things which might take quite some effort to configure for possibly marginal gain. So, consider this section optional.
🔗Including figures in Anki LaTeX
One simple way to include images is to go to the Anki editor, put in
[/latex], insert an image by dragging it into the editor field, and open up
[latex] again. This way Anki will just compile the two LaTeX blocks
separately, and insert the image in between with HTML.
If you prefer a heavily overengineered method to include actual LaTeX figures, however, read on. Note that I did the steps below on an Arch Linux installation, which may or may not work on other machines.
🔗Make a directory for images
When Anki compiles LaTeX, it does so in some temporary directory. It can be configured to pull images from some specific directory, however, which is why you need to make one.
🔗Modify LaTeX header
In the menu of the Browsing window, go to Notes > Manage Note Types > [Select the note type you're using] > Options. There, you should see a Header and a Footer section. In the header section, above \begin{document}, add
\usepackage{graphicx}
\graphicspath{{<PATH TO YOUR IMAGE DIRECTORY>}}
🔗Modify LaTeX compilation process
So far so good. However, now is the difficult part. For some reason the default LaTeX compilation process fails to find image files, or at least failed for me. For that purpose, I modified the LaTeX build process by using the Edit LaTeX build process plugin.
Once you install it, go to Tools > Add-ons > Edit LaTeX build process and then modify the pngCommands bit into:
"pngCommands": [
        [
            "pdflatex",
            "-interaction=nonstopmode",
            "--shell-escape",
            "tmp.tex"
        ],
        [
            "gs",
            "-dSAFER",
            "-r300",
            "-sDEVICE=pngalpha",
            "-o",
            "tmp_to_trim.png",
            "tmp.pdf"
        ],
        [
            "convert",
            "-trim",
            "tmp_to_trim.png",
            "tmp.png"
        ]
    ]
Note that you need to have pdflatex, ImageMagick, and ghostscript installed for this to work.
For details on the Ghostscript command, see here. You could also use ImageMagick's less obscure convert -density 200 -trim tmp.pdf tmp.png, however due to security issues mentioned in that link it's a bit of an icky thing to enable this capability on Arch Linux.
Now turn your Anki off and on again. The cards which had images that failed to compile should now hopefully work.
🔗Quickly inserting screenshots of lectures
With the above setup, it is also easy to quickly insert screenshots of diagrams
from lectures into your flashcards. Here's a little shell script for Linux
which uses maim for taking screenshots,
notify-send for showing notifications whether or not it worked, and xclip for
copying filename into the clipboard. I would put this script into
~/.local/scripts/ankiss, make it executable, and make sure that
~/.local/scripts is in the PATH environment variable.
#!/usr/bin/bash

notify="notify-send -a ankiss Ankiss "

if [ $# -eq 0 ] ; then
    $notify -t 3000 "Image name not provided"
elif [ $# -eq 1 ] ; then
    FILENAME="$1.png"
    $notify -t 3000 "Image will be saved as $FILENAME"
    maim -s ~/Crypt/Courses/Anki/images/$FILENAME 1> /tmp/ankiss_stdout 2> /tmp/ankiss_stderr
    if [ $? -eq 0 ] ; then
        $notify -t 10000 "Image saved as $FILENAME"
        echo "$1" | xclip -selection c
    else
        $notify -t 10000 "Failed with error: $(cat /tmp/ankiss_stderr)"
    fi
else
    $notify -t 3000 "Wrong number of arguments: $#"
fi
Then, to quickly insert the screenshots you take using the above script, I
suggest making a snippet that inserts an image when you type img<TAB> and
allows you to quickly copy-paste the image name from clipboard
snippet img "image" w
\begin{center}\includegraphics[width=0.8\textwidth]{$1}\end{center} $0
endsnippet
🔗Rendering multi-page proofs into cards
Sometimes, a proof is just too hard to split up nicely. By default, for every
[latex] ... [/latex] field, Anki will render the card into pdf, and then just
take the first page. If the proof takes multiple pages, then anything past the
first page won't be rendered in the flashcard.
This can be fixed easily, by dividing the card into two [latex] ... [/latex]
fields by hand. Of course, there is also a spectacularly over-engineered
solution that you can do instead to have it done automatically.
To do that, we need to modify the latex compilation process similarly to a previous section. The process below will render the card into pdf, convert each page into a png file, and append them to each other.
    "pngCommands": [
        [
            "pdflatex",
            "-interaction=nonstopmode",
            "--shell-escape",
            "tmp.tex"
        ],
        [
            "gs",
            "-dSAFER",
            "-r200",
            "-sDEVICE=pngalpha",
            "-o",
            "tmp_to_trim%03d.png",
            "tmp.pdf"
        ],
        [
            "convert",
            "-trim",
            "-background",
            "none",
            "tmp_to_trim*.png",
            "+append",
            "tmp.png"
        ],
        [
            "find",
            ".",
            "-name",
            "tmp_to_trim*.png",
            "-delete"
        ]
    ]